Aside from radio functionality, one of the things that I would like to be able to do without a computer is check the weather in the morning. I use Weather Underground to check my weather - a neat, community based weather website with many features (including an API - more on that later). One of my favorite parts of this site is the simple statement under the 5-day forecast, along the lines of "Tomorrow is forecast to be Much Warmer than today." It would be useful to be able to view this statement without turning on my computer. Since it is such a small amount of information (only 5 different possibilities), it would be silly to dedicate complicated hardware to this. Instead, I will be displaying the result on an RGB LED (for now 2 LEDs) that fades between blue and red, based on the forecasted temperature relative to the past day.
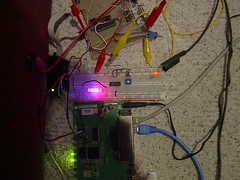
I am developing this system using an ATMEGA168P, programmed in C. Excuse the appearance of my development hardware - it is not nearly as complicated as it looks. I'm simply using what I had available, which was originally constructed for a different purpose.
Software on the Router
First, I wrote a script for the router to check the forecast, and output the result as a number from 1 to 5. This would then be easy for the AVR to interpret. Since the router is considerably more powerful, it is logical to do as much processing on the router as possible. All of these scripts were written using vi, with a telnet connection to the router. To use this script, put this file in a location that the $PATH variable points to, such as /usr/bin/, and use chmod 577 to make it executable. Unfortunately, the statement that I want is not contained in the API output, so the script uses wget to extract the contents of the Weather Underground search result website. The rest of the script is beyond the scope of this post, but there is a lot of information about shell scripting available on the internet.
#! /bin/ash
#reltemp.sh
FORECAST=`wget -q -O - "http://www.wunderground.com/cgi-bin/findweather/getForecast?query=$ZIPCODE" | grep 'is forecast to' | sed 's/<[^>]*>//g;s/^ [ ]*//g' `
#echo $FORECAST
case $FORECAST in
"Tomorrow is forecast to be Much Warmer than today."|"Today is forecast to be Much Warmer than yesterday.")
echo 5
;;
"Tomorrow is forecast to be Warmer than today."|"Today is forecast to be Warmer than yesterday.")
echo 4
;;
"Tomorrow is forecast to be nearly the same temperature as today."|"Today is forecast to be nearly the same temperature as yesterday.")
echo 3
;;
"Tomorrow is forecast to be Cooler than today."|"Today is forecast to be Cooler than yesterday.")
echo 2
;;
"Tomorrow is forecast to be Much Cooler than today."|"Today is forecast to be Much Cooler than yesterday.")
echo 1
;;
*)
echo 0
;;
esac
Now, we have to set up our location in the environment variable ZIPCODE. Simply add the following line to the /etc/profile file, obviously with your own zip code.
export ZIPCODE=19104
With this complete, simply type reltemp.sh, and in a couple of seconds, a number between 1 and 5 should appear on the terminal, indicating the forecasted temperature of tomorrow relative to today, or today relative to yesterday, based on the time of day.
External Interface
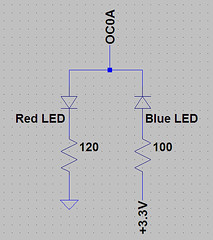
Now, the AVR must talk to the router in order to display the information. Although not pictured, the hardware is relatively simple. The AVR must be connected to power (provided by the router), a 20 MHz crystal oscillator, and the serial Rx and Tx on the router. Additionally, connect the LEDs as shown in the schematic below. This is connected to the PWM output of the AVR, so that a high signal will turn the red LED on, and a low signal will turn the blue LED on. Therefore, changing the duty cycle of a wave applied between the LEDs allows them to fade between blue and red. Change resistor values as needed to balance the shades, based on the brightness of the LEDs.
Please note, although we developed similar solutions in parallel, what I did is slightly different from what Jeff does in his parts 6 and 7. I used the default router baud rate of 115.2k, but communication was only stable if I ran the AVR with a baud rate of 110k. You might have to tweak this value for your router, or clock it down as shown at mightyOhm.
/*
Copyright: Hal Emmer 2008
License: Creative Commons Attribution-Noncommercial-Share Alike 3.0
For atmega168, at 20 MHz.
*/
#include <stdio.h>
#include <avr/io.h>
#include <avr/eeprom.h>
#include <ctype.h>
#include <avr/interrupt.h>
#define FOSC 20000000
#define BAUD 110000 //router is nominally 115.2k bps, communication is most stable at 110k bps.
#define MYUBRR FOSC/8/BAUD-1 //double speed
//#define MYUBRR
#define sbi(var, mask) ((var) |= (uint8_t)(1 << mask))
#define cbi(var, mask) ((var) &= (uint8_t)~(1 << mask))
#define STATUS_LED 0
#define BUFFERSIZE 80
volatile unsigned int global_time1;
//======================
//Define functions
//======================
static int uart_putchar(char c2, FILE *stream);
uint8_t uart_getchar(void);
static FILE mystdout = FDEV_SETUP_STREAM(uart_putchar, NULL, _FDEV_SETUP_WRITE);
void init(void);
void get_output(char *str);
void get_rel_temp(void);
//======================
int main (void)
{
init(); //Setup IO pins and defaults
printf("\nreltemp.sh\n");
while(1){
if (global_time1 >= 4578){ //4578 = 1 minute
global_time1 = 0;
get_rel_temp();
}
}
}
void init (void)
{
//1 = output, 0 = input
DDRB = 0b11101111; //PB4 = MISO
DDRC = 0b11111110; //
DDRD = 0b11111110; //PORTD (RX on PD0)
//USART Baud rate: 115200
UBRR0H = ((MYUBRR >> 8));
UBRR0L = MYUBRR;
UCSR0B |= (1<<RXEN0)|(1<<TXEN0);
UCSR0A |= (1<<U2X0); //double rate
stdout = &mystdout; //Required for printf init
/* Set up PWM (for fading LED)*/
DDRB |= (1 << 3); // OC1A (PB3),outputs
ICR1 = 20000; // TOP, set for 125Hz
OCR1A = 10000; // neutral/purple
TCCR1A = (1<<COM1A1)|(1<<WGM11); // Clear on compare, set at TOP
TCCR1B = (1<<WGM13)|(1<<WGM12)|(1<<CS11); // Timer 1 fast PWM mode 14 , /8 prescaler
/* Set up TOI on timer2 for task timing */
TCCR2B |= (1<<CS22)|(1<<CS21)|(1<<CS20); //Start Timer2 with 1/1024 prescaler.
TIMSK2 |= (1<<TOIE2); //enable timer2 overflow interrupt
TIFR2 |= (1<<TOV2); //clear the mask
sei();
}
static int uart_putchar(char c2, FILE *stream)
{
//if (c2 == '\n') uart_putchar('\r', stream);
loop_until_bit_is_set(UCSR0A, UDRE0);
UDR0 = c2;
return c2;
}
uint8_t uart_getchar(void)
{
while( !(UCSR0A & (1<<RXC0)) );
return(UDR0);
}
/* not used right now */
void get_output(char *str) {
unsigned char count;
for (count = 0; count < BUFFERSIZE; count++) {
str[count] = uart_getchar();
if (str[count] == '@' && str[count - 1] == 't')
break;
}
str[count - 5] = '\0';
}
void get_rel_temp(void){
char c = 0;
printf("\nreltemp.sh\n"); //as the router for the relative temperature
while(!isdigit(c)) //get a character until you get a digit
c = uart_getchar();
switch(c){
case '0':
OCR1A = 10000; // error / purple
break;
case '1':
OCR1A = 0; // much cooler / blue
break;
case '2':
OCR1A = 2500; // cooler / blue-purple
break;
case '3':
OCR1A = 10000; // same temp as / purple
break;
case '4':
OCR1A = 17500; // warmer / red-purple
break;
case '5':
OCR1A = 20000; // much warmer / red
break;
default:
OCR1A = 10000; // error / purple
break;
}
}
ISR(TIMER2_OVF_vect)
{
global_time1++;
//uart_putchar('0'+global_time1, stdout);
TIFR2 |= (1<<TOV2);
}
That should do it. Next time I will explore how to display the next important piece of information - if it will be sunny, cloudy, rainy, etc. After that I will wrap up the project in a more presentable package.


